Templates
Browse, create, validate and send the communication templates of a tenant, and maintain their examples.
Manage the communication templates of the selected tenant: the text of each communication per type, channel and language. The screen has two tabs: Templates, to browse, create, validate and send them, and Examples, to maintain the test cases they are validated against.
Find a template
- Open Templates. The Templates tab shows one row per template with its type, channel, language, delivery window, update date and the start of the subject or content.
- Filter by Type, Subject or Content by typing part of the text, or by Channel and Language by picking a value.
- Expand a row with › to see the type description, its arguments, the sender, the creation date and the content.
- To see the rendered template, press Preview email, Preview SMS or Preview WhatsApp. You can change the argument values and see the result in the Design and RAW tabs. In RAW, Download RAW saves the code.
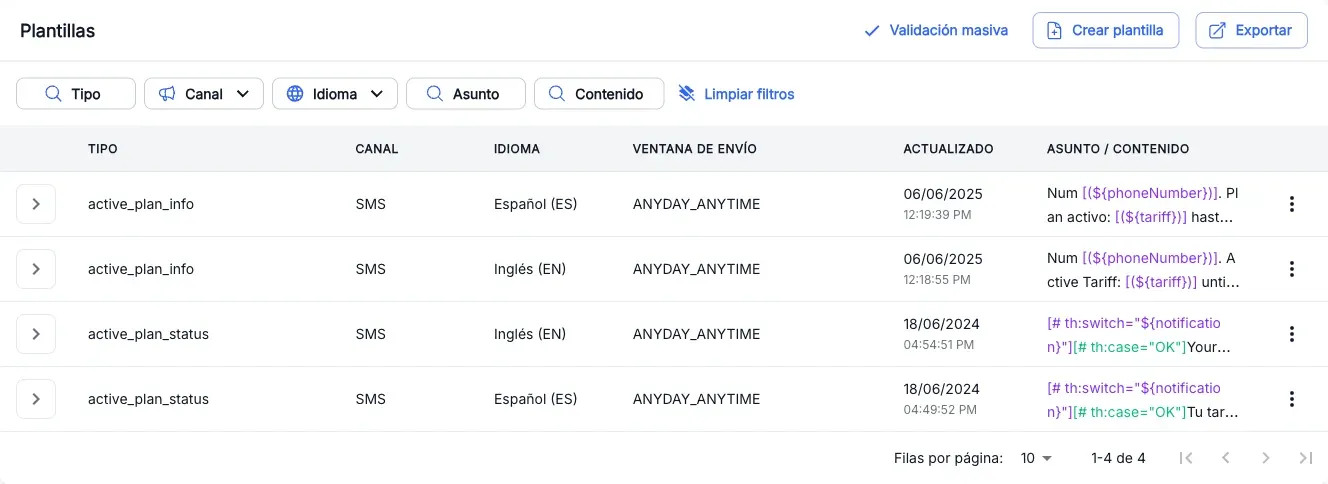
Export downloads the list as a CSV file.
Create a template
A template can only be saved if there is at least one example for its type, channel and language and all its examples pass. If there is none, create it first.
- Press Create template.
- In New template, pick the Type, the Channel and the Language.
- Fill in the sender for the channel:
- Email: Email, Name and Subject.
- SMS: Sender, 11 characters at most.
- WhatsApp: it has no sender.
- Write the content in the HTML content, SMS content or WhatsApp content card. For WhatsApp, the content is a JSON with a
handoffIdfield. - In the selector at the bottom, press Load example and pick one. Its values fill Arguments and Preview shows the result.
- Wait for the automatic validation against the examples to finish. The Validate button turns green if they all pass and red if any fails; press it to see the detail.
- Press Save. You see “Template successfully saved” and the template opens so you can keep editing it.
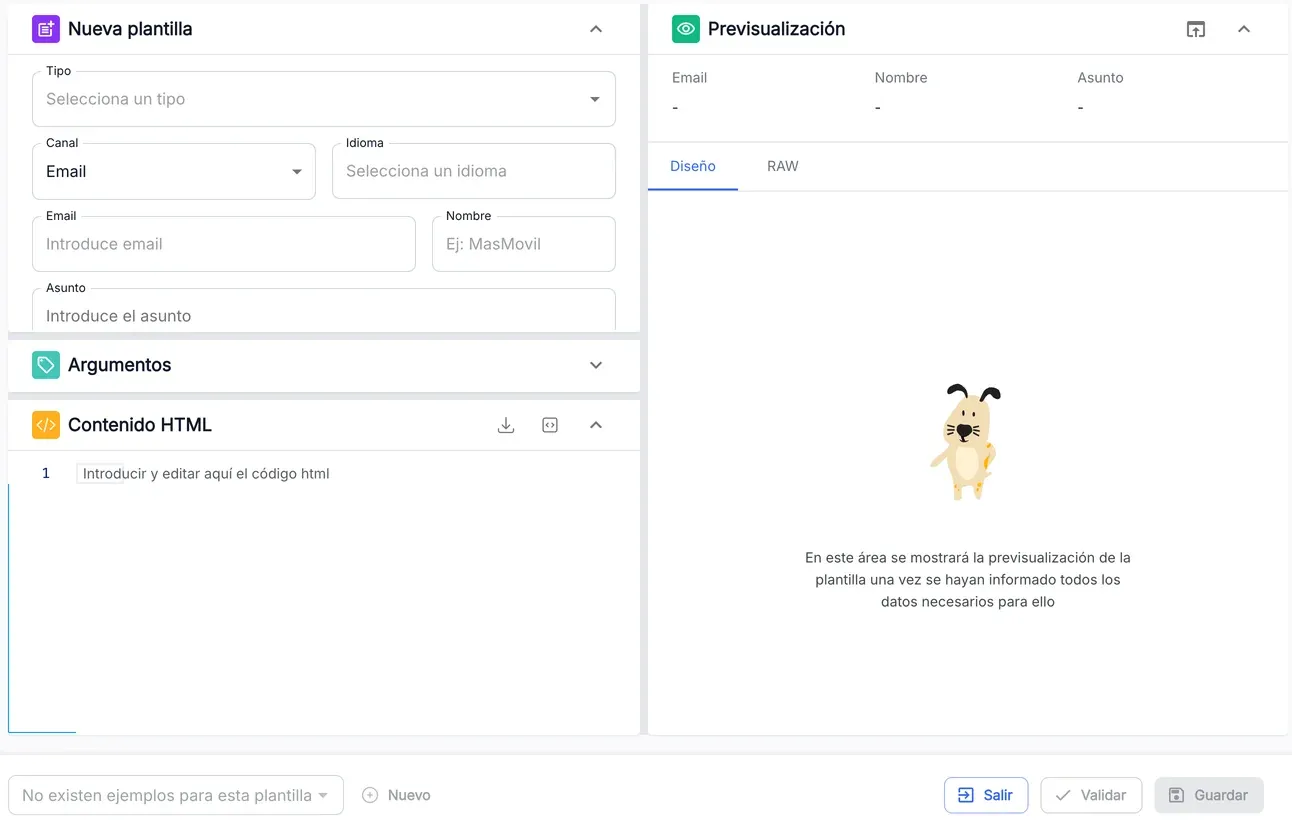
Next to the example selector, New opens example creation in another tab with the type, channel and language already chosen, and Edit opens the loaded example. If you leave with unsaved changes, Exit asks you to confirm.
Edit a template
- In the row of the template, open the ⋮ menu and press Edit.
- Change the sender, the content or the argument values. The type, channel and language cannot be changed.
- Wait for the validation to finish in green and press Save.
Save is only enabled when there are changes and all examples pass.
Validate templates
Validation renders the template with the arguments of each example and compares the result with the expected output. It changes nothing.
- For one template, open its ⋮ menu and press Validate. For all the templates of the tenant, press Mass validation.
- In Template validation, press Validate. Each row goes from Pending… to In progress and ends as Validated or Error.
- If you need to, press Pause validation and then Resume validation.
- Expand the rows with errors with ›: you see each example and, for every field that does not match, the Expected output and the Obtained output.
- Press Finish to close.
In mass validation you can filter by Type, Channel, Language, Status and Detail.
Send a template
Sending really delivers the communication to the recipients you enter.
- In the row of the template, open the ⋮ menu and press Send. Send template opens with four steps.
- Arguments: type the value of each argument. By default it is common to all recipients; turn on its switch if each recipient needs their own. Press Next.
- Recipients: add them in one of these ways and press Next:
- ADD RECIPIENT: type the Email and, optionally, the Name (email), or pick the prefix and type the Number (SMS and WhatsApp). Fill in the individual arguments and press Add recipient.
- LOAD CSV: press Download CSV template, fill it in and drag it onto the drop area. You see the number of records read.
- Sending: check the Send summary and the recipient list, and press Send. You can press Pause sending and then Continue sending.
- Result: when it ends you see “All records have been sent successfully” or “Errors found in recipients”. Download the report with Export log and, if there are errors, the list with Export errors. Press Finish.
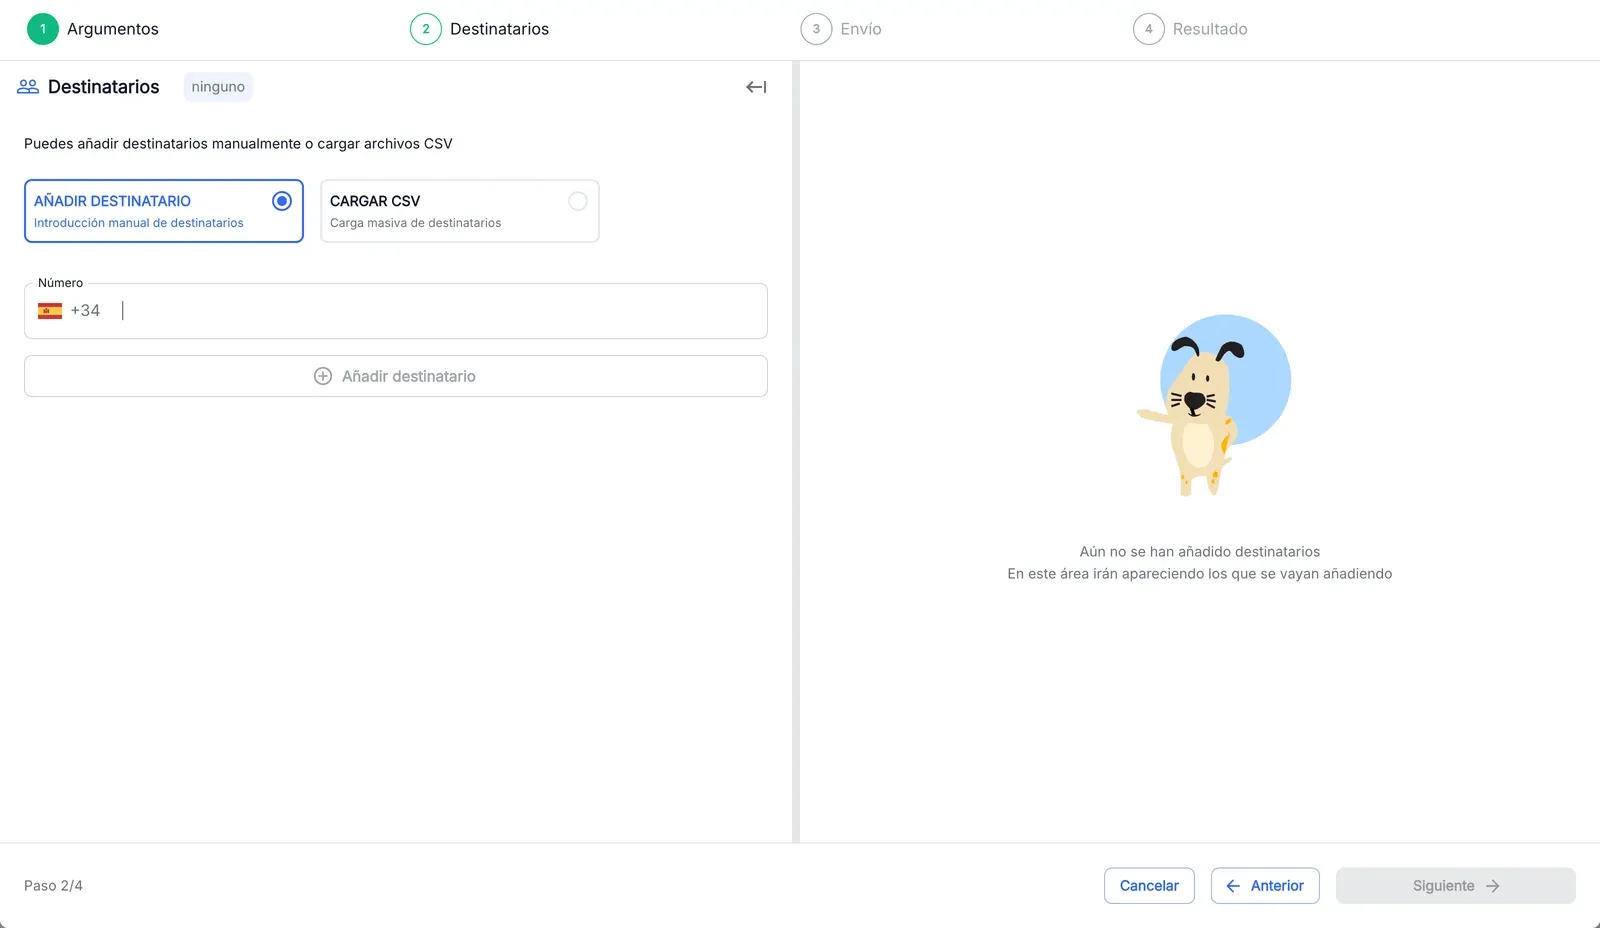
If step 2 has recipients with invalid data, pressing Next warns you: No, I wish to continue removes them and they do not receive the communication; Yes, review data takes you back to the list. Cancel asks for confirmation and discards what you did.
Delete a template
- In the row of the template, open the ⋮ menu and press Delete.
- In Delete template, check the type, channel and language, and press Accept. You see “Template deleted”.
Browse the examples
An example is a test case: some values for the arguments of a type and the expected output the template of that type, channel and language must produce with them.
- Open the Examples tab.
- Filter by Type, Subject, Content, Description or Reference by typing part of the text, or by Channel and Language by picking a value.
- Expand a row with › to see the Reference, the Creation date and, when you press them, the example’s Arguments and Expected output.
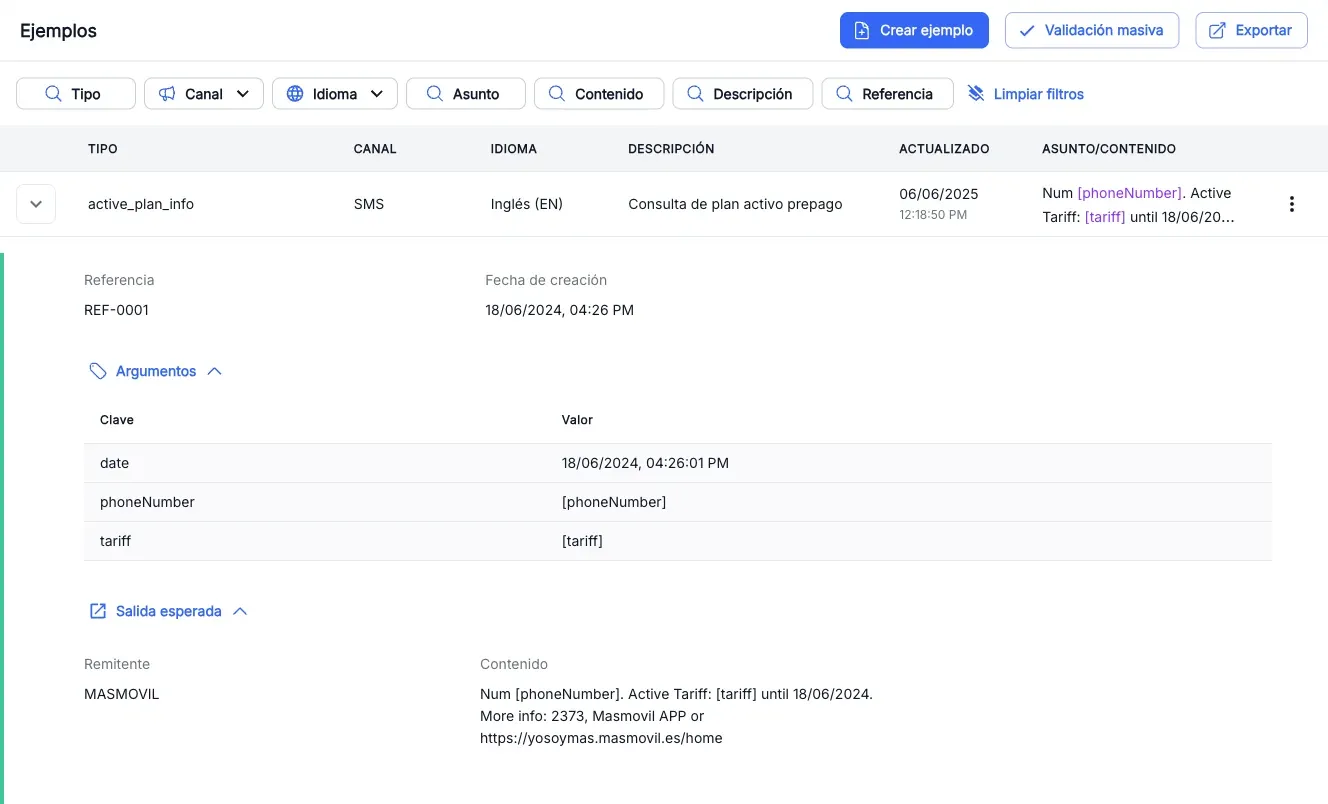
Export downloads the list as a CSV file, and Mass validation validates all the examples of the tenant against their templates.
Create an example
- In the Examples tab, press Create example.
- Pick the Type, the Channel and the Language. Optionally, fill in the Reference and the Description.
- In Expected output, type what the template must produce:
- Email: Email, Name and Subject.
- SMS: Sender, 11 characters at most, and Content.
- WhatsApp: Content, as JSON. The
handoffIdfield is filled in with the tenant, type and language.
- In Arguments, type a value for each argument of the type. To leave one without a value, press its X; Add value brings it back.
- Press Create. You see “The example has been created successfully” and the example is validated on its own: the Validate button turns green or red. Press it to see the result.
Edit, validate or delete an example
In the row of the example, open the ⋮ menu:
- Validate: opens Template validation with the example. Press Validate and expand the row if it ends in Error.
- Edit: opens Edit example. The type, channel and language cannot be changed. Press Update to save.
- Delete: opens Delete example. Press Accept and you see “Example deleted”.
The screenshots show the Admin interface in Spanish.
When something is not as expected
| You see | What it means and what to do |
|---|---|
| Save disabled with “There must be examples against which to validate the template” | There are no examples for that type, channel and language. Create one with New or in the Examples tab. |
| Save disabled with “Some of the examples are not valid, it is not possible to save the changes” | The template does not produce the expected output of some example. Press Validate to see which field fails and fix the template or the example. |
| ”There are no examples for this template” in the selector | The type, channel or language is not chosen yet, or there are no examples for that combination. |
| The preview stays on “The template preview will be displayed here…” | Some data is missing: the type, the content or the sender for the channel. |
| ”Wrong format” on an argument and a blurred preview | The argument is a link and its value is not a URL starting with http:// or https://. |
| ”The sender can be a maximum of 11 characters” | The SMS sender is too long. Shorten it. |
| ”Template already exists” | There is already a template for that type, channel and language in the tenant. Find it in the list and edit it. |
| ”The JSON format is incorrect” | The WhatsApp content of the example is not valid JSON or is missing handoffId or headerVariables. |
| ”The file does not have the correct format for the template type” | The recipients CSV is for another channel: use Download CSV template and keep its columns. |
| ”Invalid format. This recipient will not receive the communication” | The email or the number is not valid for the chosen prefix. Fix it or remove the recipient. |
| ”Errors have been found in one or more arguments…” | A CSV value does not match the argument format (date, True/False, list or JSON). The recipient would receive it with that error. |
| A recipient ends in Error when sending | The service rejected that send. The reason is in the ERROR column; download it with Export errors. |
| Create template, Send or Create example are missing | You lack the matching write or send permission. Check the note at the top. |
Reference
Templates columns: Type, Channel (Email, SMS or WhatsApp), Language, Delivery window, Updated and Subject / Content.
Examples columns: Type, Channel, Language, Description, Updated and Subject/Content.
Validation statuses
| Status | What it means |
|---|---|
| Pending… | Not validated yet. |
| In progress | Being validated. |
| Validated | The template produces the expected output. |
| Error | Some field does not match, or it could not be validated (reason in Detail). |
Variables in a template: arguments appear as [(${argument})], for example [(${tariff})], and are highlighted in colour in the list and in the editor.
Recipients CSV: the columns are EMAIL,NOMBRE for email or PREFIJO,NUMERO for SMS and WhatsApp, followed by one column per individual argument. If the prefix is missing, +34 is used.